The Great Orion Nebula, M42, in narrowband. Two processing versions, using HOO palette (more natural looking) and SHO (more detailed, as it also includes Sulfur).
M42 - first narrowband attempt
This started mostly just as a test session, since the first part of the night was cursed with passing clouds right in front of my target. I also had some problems with the autofocuser (that just stopped working at some point), and balancing issues.
All things considered, not too bad...
I processed the image in both HOO palette (more natural looking) and SHO.
California Nebula
Conditions weren't exactly ideal: light pollution, obviously, then clouds rolled in just when I was ready to start my sequence, shortening capture time by a couple of hours.
Also, the nearly full moon was very close to the target, causing some nasty reflections on the (now cropped out) border of the image.
Overall I'm quite satisfied by the result though, the Optolong L-Enhance filter seems to be doing a really great job.
This is the third processed image from my trip to Namibia, probably the best one of the entire set, since it has the most data: almost three half nights of "gross time", but barely 4 hours after discarding bad frames.
Lagoon and Trifida nebulae
To the right, you can see the big and gorgeous Lagoon nebula. On the left side, the much smaller, but still nice and interesting (and more coloured) Trifid Nebula.
They're both also known respectively as M 8 and M 20, from the Messier catalogue.
Technical data:
Camera: ASI183MM
Mount: Star Adventurer (no autoguiding).
Telescope: TS Apo 60mm F/5.5 with 0.79x focal reducer (focal length: 265mm).
Filters: Astronomik LRGB Typ IIc
Shooting software: AstroPhoto Plus
Processing: Pixinsight
More details and...
Another update from my trip to Namibia. Here's a second processed image, the Tarantula Nebula, this time inside the Large Magellanic Cloud.
Tarantula Nebula
This is a star forming region, very similar to the famous Orion Nebula that we can see from our latitudes, only this is way bigger. If the Tarantula Nebula was as close to us as the Orion Nebula it would even cast a visible shadow.
Technical data:
Camera: ASI183MM
Mount: Star Adventurer (no autoguiding).
Telescope: TS Apo 60mm F/5.5 with 0.79x focal reducer (focal length: 265mm).
Filters: Astronomik LRGB Typ IIc
Shooting software: AstroPhoto Plus
Processing: Pixinsight
More details and full resolution image on the Astrobin page
After long planning I finally went to Namibia, under one of the darkest sky on the planet, with the main intent of a fully astronomical holiday. The trip was exausting, and I've barely started processing images. Here's a first image:
Small Magellanic Cloud
It's a zoomed detail of the Small Magellanic cloud, one of the two dwarf companion galaxies of our Milky Way.
Technical data:
Camera: ASI183MM
Mount: Star Adventurer (no autoguiding).
Telescope: TS Apo 60mm F/5.5 with 0.79x focal reducer (focal length: 265mm).
Filters: Astronomik LRGB Typ IIc
Shooting software: AstroPhoto Plus
Processing: Pixinsight
More details and full resolution image on the Astrobin page
Last saturday, after lots of garden testing and software checks, I've finally been able to drive to a dark place for a few deep sky shots.
The driving part itself was the most "scary", as I'm still new to driving in the "wrong side" of the road... Getting the hang of it, though..
I chose to go observing with the HantsAstro stargazing group.. they met in a quite dark site (at least for being not too far from London), and their website and facebook pages really did inspire me. I'm really glad I joined them, as it was a really pleasant evening, with lots of nice people.
My target for the evening was the center of the Cygnus constellation, between Deneb and Sadr. It's an area full of nebulae, perfect for a wide field lens. Technical data, together with stars and object names, can be found in the astrobin technical page.
Cygnus' heart
I'm currently living in a house with a very nice backyard, right outside London. Still a lot of light pollution, but it can be manageable, and useful for testing my equipment before running to darker locations.
This was meant to be a (L)RGB shot, but light pollution and humidity made the blue and green channels pretty useless, while red channel produced quite good results
Last friday night the sky was finally very clear, so I made a few shots.
M 42, HorseHead, Flame Nebula
Blog article: http://blog.gulinux.net/blog/2016-11-29-wide-field-orion-nebula-flame-horsehead
The brilliant Orion Nebula (M42) is very well defined, but also the Flame nebula (NGC 2024) is quite conspicuous on the left. And very close t...
After rediscovering Siril, a nice astronomical images preprocessing tool for GNU/Linux, I wanted to give another try at processing a few test images taken this summer.
It’s surely not a masterpieces, but I’m not too disappointed either by what I could make of them, given that it was just a basic attempt, with no more than half hour total shoot time.
M42
Postrocessing was done using DarkTable.
It’s been a long time since I last wrote about SkyPlanner development, but I still kept working on it, enabling lots of new features.
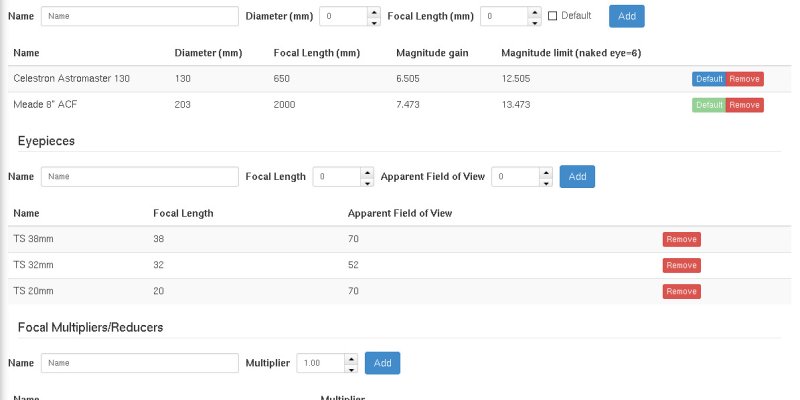
The Telescopes page has been redesigned to include also eyepieces and barlow/focal reduces, and therefore has also been renamed to “Optical Instruments” in your settings menu.

Adding at least a telescope and an eyepiece will show a new panel in the session pages, with all possible combinations, calculating magnification and field of view.
It will also add a new menu when clicking on a DSS preview image, that will show you field of view circles overlay.


Filters have been heavly improved. We have now lots of new filters, and the existing ones were redesigned to offer a better experience.
Now you can filter by object type, by magnitude, time of transit, altitude, constellation, previously observed objects, angular size, catalogue. Filters are available both in the main objects list and in the “Suggested Objects” panel, allowing you to fine tune SkyPlanner suggestions for planning your stargazing night.
The “Suggested Objects” list can now be sorted also by magnitude and time.
A new interesting feature is the post-session report: when reviewing a past session, you can mark as observer each object in your list.
After doing so, a “report” button will appear for that object, allowing you to write an extended description of your observation.
Finally, clicking the “Report” button on the top toolbar will display your report almost ready to be printed. You may wish to click the “Write report” button to write some notes about the whole session, instead of single objects.
Additionally, you can share your report. By default this is disabled, but clicking the “Share” button will make it publicly available.
You can share it with a few options: first, a web address, that you can embedd on your blog/website, or send via email. But you can also one of the predefined buttons for social sharing, on Google+, Facebook, Twitter.
But sharing is now enabled also for the regular session planning: in the “preview with images” section of a planned session you’ll see the same “Share” button.
Lastly, there were a few additions to the objects catalogues, most notably the Barnard catalogue of dark objects.
These were just a few highlights, to find out more just go to SkyPlanner home page and try it.
I’ve been long waiting for sharing SkyPlanner source code in a public repository.
Problem is, I had to fix a few copyright headers, cleanup some stuff, and, you know, laziness.
Now I finally published them on my GitHub account: https://github.com/GuLinux/SkyPlanner.
It’s still missing a README file for compiling and all, but if someone is curious about how SkyPlanner works, this is a huge start for poking it.
Happy hacking!