This is the first of a series of articles. As I'm always experimenting and tuning my setup, I'm not sure how many more articles I'll be writing.
A few years ago I began to introduce myself to astrophotography. I had some fairly nice equipment back then: a SkyWatcher HEQ5 mount, a Meade ACF 8", guide scope and camera, a borrowed reflex, laptop, 12v car battery.
Although this is pretty much entry level equipment, barely sufficient to getting started, it had been already quite expensive (almost 2000€ just for scope and mount, even though the scope was second hand), bulky and heavy. I ended up barely using it, both because of a relatively steep learning curve and because I honestly was getting tired of carrying around 20/30KG of equipment with barely any tangible result.
Then a few things happened: the mount was stolen, I sold the optical tube, and ended up moving to London, where I embraced a new "astronomical philosophy": the lighter, the better.
A very convenient tecnique in c++ programming is the one known with many names: "d-pointer" (found in Qt/KDE contexts), shadow pointer, "pimpl", opaque pointer. Basically the idea is to hide all the private details of a class in a forward declared private pointer, which will be the only real private member of the class. Since this member will never change, this will guarantee binary compatibility among different versions of a library.
But there are other advantages in using d-pointers: one is compilation speedup during development (usually if you change a private member of a class, the header changes, and you have to recomplile all units using that header, while with d-pointer you change only the .cpp file), and another is code cleanup: you will have very compact header files, describing your class public interface without private stuff pollution. Also, sometimes you may want to add your d-pointer definition in a separate header file, ending up with three well defined files:
- myclass.h: class declaration, only public stuff, without private stuff
- myclass_p.hpp: private class declaration: only private stuff, no implementations
- myclass.cpp: only implementations
The classical approach is to create a plain raw pointer to a forward declared class, initialize it in the constructor, and delete it on the destructor. A nice addition is to have the private class be a nested type, so that you can avoid polluting your IDE class list.
It’s been a long time since I last wrote about SkyPlanner development, but I still kept working on it, enabling lots of new features.
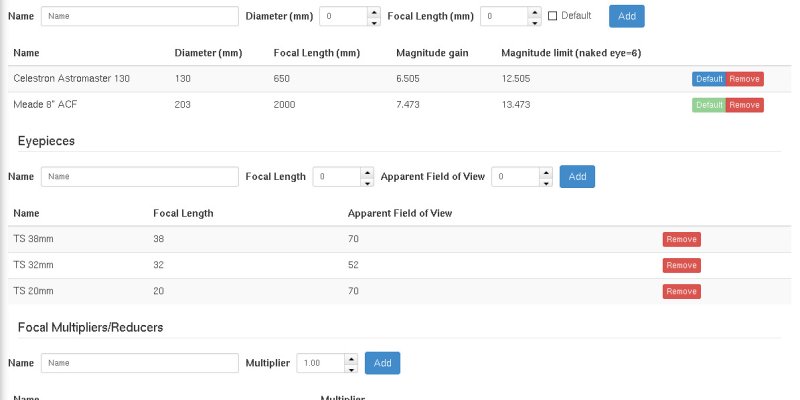
The Telescopes page has been redesigned to include also eyepieces and barlow/focal reduces, and therefore has also been renamed to “Optical Instruments” in your settings menu.

Adding at least a telescope and an eyepiece will show a new panel in the session pages, with all possible combinations, calculating magnification and field of view.
It will also add a new menu when clicking on a DSS preview image, that will show you field of view circles overlay.


Filters have been heavly improved. We have now lots of new filters, and the existing ones were redesigned to offer a better experience.
Now you can filter by object type, by magnitude, time of transit, altitude, constellation, previously observed objects, angular size, catalogue. Filters are available both in the main objects list and in the “Suggested Objects” panel, allowing you to fine tune SkyPlanner suggestions for planning your stargazing night.
The “Suggested Objects” list can now be sorted also by magnitude and time.
A new interesting feature is the post-session report: when reviewing a past session, you can mark as observer each object in your list.
After doing so, a “report” button will appear for that object, allowing you to write an extended description of your observation.
Finally, clicking the “Report” button on the top toolbar will display your report almost ready to be printed. You may wish to click the “Write report” button to write some notes about the whole session, instead of single objects.
Additionally, you can share your report. By default this is disabled, but clicking the “Share” button will make it publicly available.
You can share it with a few options: first, a web address, that you can embedd on your blog/website, or send via email. But you can also one of the predefined buttons for social sharing, on Google+, Facebook, Twitter.
But sharing is now enabled also for the regular session planning: in the “preview with images” section of a planned session you’ll see the same “Share” button.
Lastly, there were a few additions to the objects catalogues, most notably the Barnard catalogue of dark objects.
These were just a few highlights, to find out more just go to SkyPlanner home page and try it.
I’ve been long waiting for sharing SkyPlanner source code in a public repository.
Problem is, I had to fix a few copyright headers, cleanup some stuff, and, you know, laziness.
Now I finally published them on my GitHub account: https://github.com/GuLinux/SkyPlanner.
It’s still missing a README file for compiling and all, but if someone is curious about how SkyPlanner works, this is a huge start for poking it.
Happy hacking!
When programming in C++ it can often happen to be using C-style API.
These usually come in the form:
int some_api_call(char *inputParameter, char **outputParameter);where the return value is never a real output value, but instead an exit code, and usually 0 means success.
To handle such API in a sequence of operations, one is then usually blinded to do something like this:
 int result = first_c_api_call();
 if(result != 0) {
 cerr << "Error executing first_c_api_call: " << result << endl;
 return;
 }

result = second_c_api_call();
if(result != 0) {
cerr << "Error executing second_c_api_call: " << result << endl;
return;
}

result = third_c_api_call();
.....
and so on, which is kinda boring when you have to call lots of API functions in one method.
I have been trying to write some kind of wrapper that can help making this a bit easier.
In a real life example, I’ve been trying to use gphoto2 api in a c++11 application.
Using c++11 lambdas and RAII this is what I’ve been able to do:
 void GPhotoCamera::connect() {
      CameraAbilities abilities;
      GPPortInfo portInfo;
      CameraAbilitiesList *abilities_list = nullptr;
      GPPortInfoList *portInfoList = nullptr;
      CameraText camera_summary;
      CameraText camera_about;
      int model, port;
      gp_api{ {
        sequence_run( [&]{ return gp_abilities_list_new (&abilities_list); } ),
        sequence_run( [&]{ return gp_abilities_list_load(abilities_list, d->context); } ),
        sequence_run( [&]{ model = gp_abilities_list_lookup_model(abilities_list, d->model.toLocal8Bit()); return model; } ),
        sequence_run( [&]{ return gp_abilities_list_get_abilities(abilities_list, model, &abilities); } ),
        sequence_run( [&]{ return gp_camera_set_abilities(d->camera, abilities); } ),
        sequence_run( [&]{ return gp_port_info_list_new(&portInfoList); } ),
        sequence_run( [&]{ return gp_port_info_list_load(portInfoList); } ),
        sequence_run( [&]{ return gp_port_info_list_count(portInfoList); } ),
        sequence_run( [&]{ port = gp_port_info_list_lookup_path(portInfoList, d->port.c_str()); return port; } ),
        sequence_run( [&]{ return gp_port_info_list_get_info(portInfoList, port, &portInfo); return port; } ),
        sequence_run( [&]{ return gp_camera_set_port_info(d->camera, portInfo); } ),
        sequence_run( [&]{ return gp_camera_get_summary(d->camera, &camera_summary, d->context); } ),
        sequence_run( [&]{ return gp_camera_get_about(d->camera, &camera_about, d->context); } ),
      }, make_shared<QMutexLocker>(&d->mutex)}
      .on_error([=](int errorCode, const std::string &label) {
        qDebug() << "on " << label << ": " << gphoto_error(errorCode);
        emit error(this, gphoto_error(errorCode));
      }).run_last([&]{
        d->summary = QString(camera_summary.text);
        d->about = QString(camera_about.text);
        emit connected();
      });
      // TODO d->reloadSettings();
      gp_port_info_list_free(portInfoList);
      gp_abilities_list_free(abilities_list);
}
I can then declare some variables in the first part of the method, and inside the “gp_api” block i can execute a sequence of operation, each one returning an int value. This value is automatically checked for an error, and if it it’s a success exit code, the next sequence block is executed.
run_last is finally executed if all steps are completed successfully. An optional mutex locker (QMutexLocker) is passed to the gp_api block as the last constructor argument, to automatically lock the c api for multithreading.
How have I accomplished this?
This is the main class so far:
#include <functional>
#include <list>
#include <mutex>

typedef std::shared_ptr<std::unique_lock<std::mutex>> default_lock;
template<typename T, T defaultValue, typename check_operator = std::equal_to<T>, typename RAII_Object = default_lock>
class sequence {
public:
  typedef std::function<T()> run_function;
  typedef std::function<void(const T &, const std::string &)> on_error_f;
  struct run {
    run_function f;
    std::string label;
    T check;
    run(run_function f, const std::string &label = {}, T check = defaultValue) : f(f), label(label), check(check) {}
  };
  sequence(const std::list<run> &runs, const RAII_Object &raii_object = {}) : runs(runs), _check_operator(check_operator{}), raii_object(raii_object) {}
  ~sequence() {
    for(auto r: runs) {
      T result = r.f();
      if(! _check_operator(result, r.check)) {
    _run_on_error(result, r.label);
    return;
      }
    };
    _run_last();
  }
  sequence &on_error(on_error_f run_on_error) { _run_on_error = run_on_error; return *this; }
  sequence &run_last(std::function<void()> run_last) { _run_last = run_last; return *this; }
  sequence &add(run r) { runs.push_back(r); }
private:
  std::list<run> runs;
  on_error_f _run_on_error = [](const T&, const std::string&) {};
  check_operator _check_operator;
  std::function<void()> _run_last = []{};
  RAII_Object raii_object;
};
#define sequence_run(...) { __VA_ARGS__ , #__VA_ARGS__}
The sequence class accepts a list of runs as construction parameters. These are stored as a class field, and sequentially executed at class destruction.
Sequence is a template class: you can define the return value type, the success value, a comparison operator to check each function result code against the success value, and finally a generic RAII_Object, which can be as previously told a mutex locker, or some other kind of resource to unlock after API executions.
The define directive at the end of the code is used to automatically create a run object which already contains a description of the code being executed (stringified).
You get this description in the on_error callback.
Near my gphoto class I also added a typedef to conveniently call the proper sequence template class with correct template parameters:
typedef sequence<int, GP_OK, std::greater_equal<int>, std::shared_ptr<QMutexLocker>> gp_api;Which means that gp_api accepts code blocks returning int values, that the “ok” value is GP_OK (0), and that the returned value must be equal or greater than GP_OK to be considered a success run.
It also accepts a QMutexLocker shared pointer for thread locking.
As you can see in my first example I didn’t assign the gp_api object to any variable; this means that it is immediatly created, executed and destructed, for synchronous run.
So this is a simplified usage example:
gp_api{ {
  sequence_run([&]{ return first_c_api_call(); }),
  sequence_run([&]{ return second_c_api_call(); }),
}, std::make_shared<QMutexLocker>(&&;mutex)}
  .on_error([=](int errorCode, const std::string &label) {
      std::cerr << "Error at code block " << label << ": " << errorCode << std::endl;
    })
  .run_last([&]{
    // run when everything runned smoothly
  });
Notice: this article is currently available in italian only.
I will translate it soon. You may contact me via comments if you want me to “prioritize” this article first.
Mentre il maltempo imperversa impedendo di collaudare a dovere la nuova strumentazione, ne approfitto per fare qualche test “al buio” del nuovo setup, ad esempio per il pilotaggio software. Ho scelto la HEQ5 versione “Syntrek” per evitare la tentazione di abusare troppo del puntamento GOTO, e godere appieno del piacere “da smanettone” di riuscire a far tutto da se, compreso puntare quella galassietta particolarmente debole senza l’ausilio dell puntamento automatico… ma per tutte le evenienze ho comunque preso il cavetto di collegamento al pc, ed è comunque piacevole riuscire a costruire un perfetto sistema sostitutivo del più costoso telecomandino “SynScan” venduto normalmente con la montatura. Qui scriverò un semi-report di quanto son riuscito a combinare, del setup utilizzato, e suggerimenti utili per chi usa una configurazione simile alla mia.
Hardware
Per prima cosa, la montatura ovviamente: la mia è una SkyWatcher HEQ5 SynTrek (senza GOTO appunto). Quanto scritto sotto vale anche per altre varianti, come la HEQ5 con SynScan, la EQ5, o la EQ6, a patto di avere il collegamento al pc corrispondente. Per quanto riguarda il collegamento al pc: esistono due modi per collegare questo tipo di montature al pc. Uno è tramite il telecomando SynScan, che non ho preso appunto. Nel mio caso ho dovuto acquistare un interfacciamento chiamato “EQDIRECT“, che effettua il collegamento dalla porta della montatura (di tipo RJ45) a porta seriale o usb del computer. Ci sono diversi modi per acquistare questo tipo di cavo: da chi ha ideato originariamente l’interfacciamento, cioè ShoeString Astronomy, che ha diversi distributori nel mondo, Italia compres, a cloni più o meno simili, come quello che io ho acquistato presso Teleskop Express. Come computer va bene più o meno qualunque cosa, io in particolare utilizzo un netbook, che offre come vantaggi una grande trasportabilità, consumi molto ridotti e notevole durata della batteria.
Sistema Operativo e software non astronomico
Qui c’è decisamente l’imbarazzo della scelta, di distribuzioni GNU/Linux ce ne sono davvero tante, ognuno ha la sua preferita, e ci sono addirittura delle distribuzioni pronte per l’uso astronomico con tanto software dedicato già preinstallato. Io ho installato una variante di Ubuntu, LUbuntu, minimale, snella e veloce, particolarmente indicata per computer meno performanti come i netbook, appunto. Segnalo anche un software non direttamente legato all’astronomia, ma particolarmente utile: powertop, di Intel, che permette di ridurre notevolmente i consumi ed allungare la vita della batteria.
INDI e KStars
Naturalmente l’installazione di questi due software sarà ovviamente diversa per le varie distribuzioni GNU/Linux; per Ubuntu (e derivate, come LUbuntu), si può fare riferimento alla ben documentata pagina Downloads di INDI, che fornisce istruzioni anche per il repository ppa da aggiungere con pacchetti molto aggiornati e completi. In particolare, per la mia HEQ5, bisogna installare anche il pacchetto extra indi-eqmod non presente di default in ubuntu, ma presente nel ppa. Nel dubbio, si può installare il meta-pacchetto indi-full, che conterrà anche altri driver aggiuntivi (INDI può controllare non solo montature, ma anche macchine fotografiche, webcam, focheggiatori, etc etc). Installare quindi anche KStars (sudo apt-get install kstars).
Setup e utilizzo software
Configurare KStars per l’utilizzo della montatura può essere fuorviante, ma i passi da seguire sono comunque abbastanza semplici stando attenti ad alcune accortezze. Anzitutto, esiste un wizard di aggiunta telescopio, ma non è particolarmente più comodo rispetto al gestore dispositivi regolare, quindi useremo solo il secondo. Segue galleria di screenshots, nelle descrizioni di ognuno sono illustrati i passaggi da seguire.
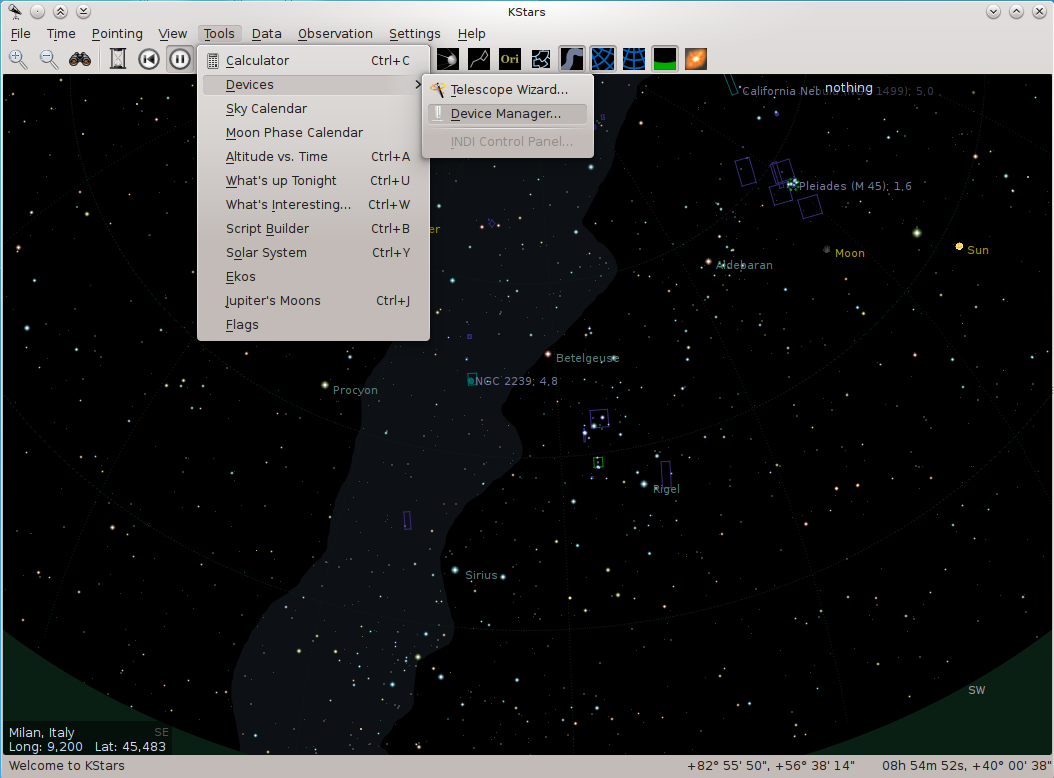
Selezionare questa voce per lanciare il Device Manager INDI
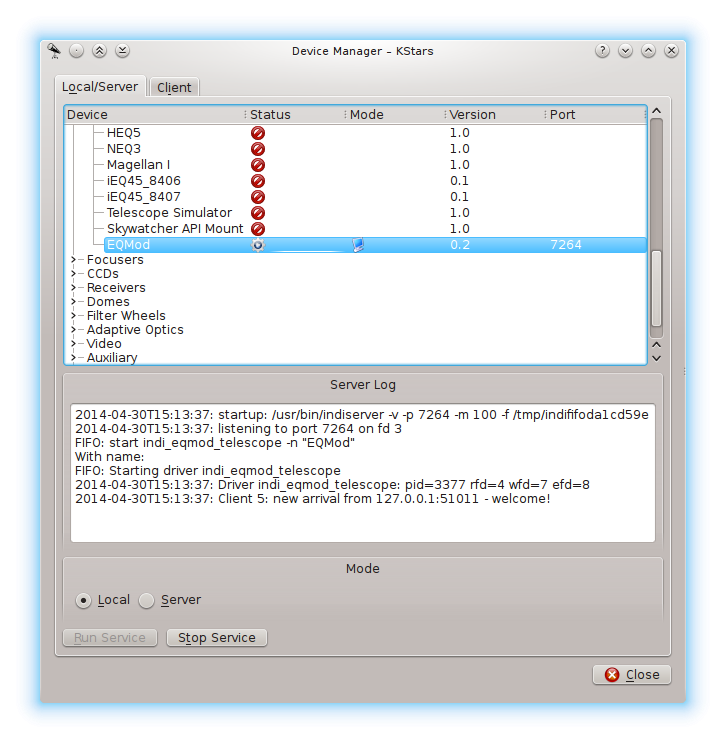
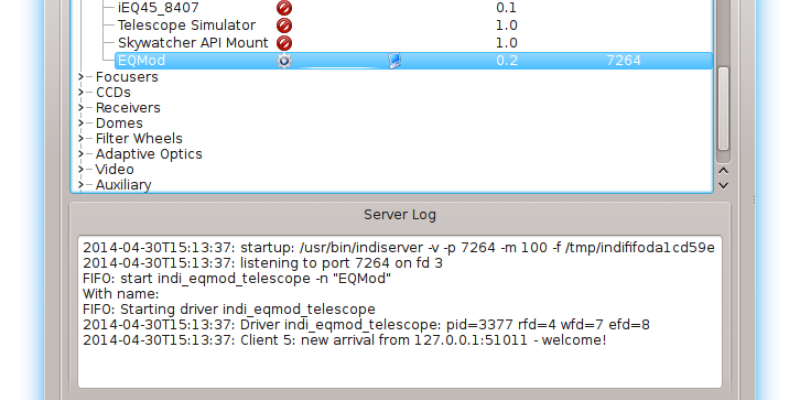
Selezionare “EQMod” tra i telescopi disponibili
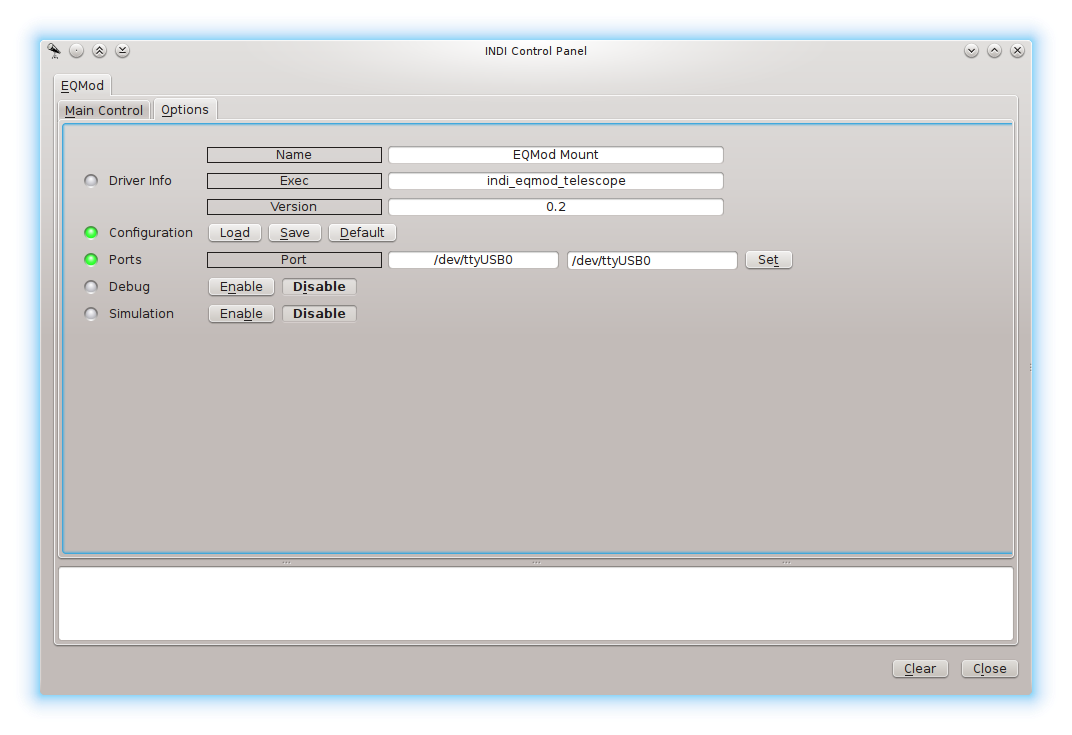
Nella Scheda “EQMod” selezionare il tab “Options”. Impostare la porta (dipende dal tipo di connessione usata), quindi per memorizzarla, premere il pulsante “Save”.
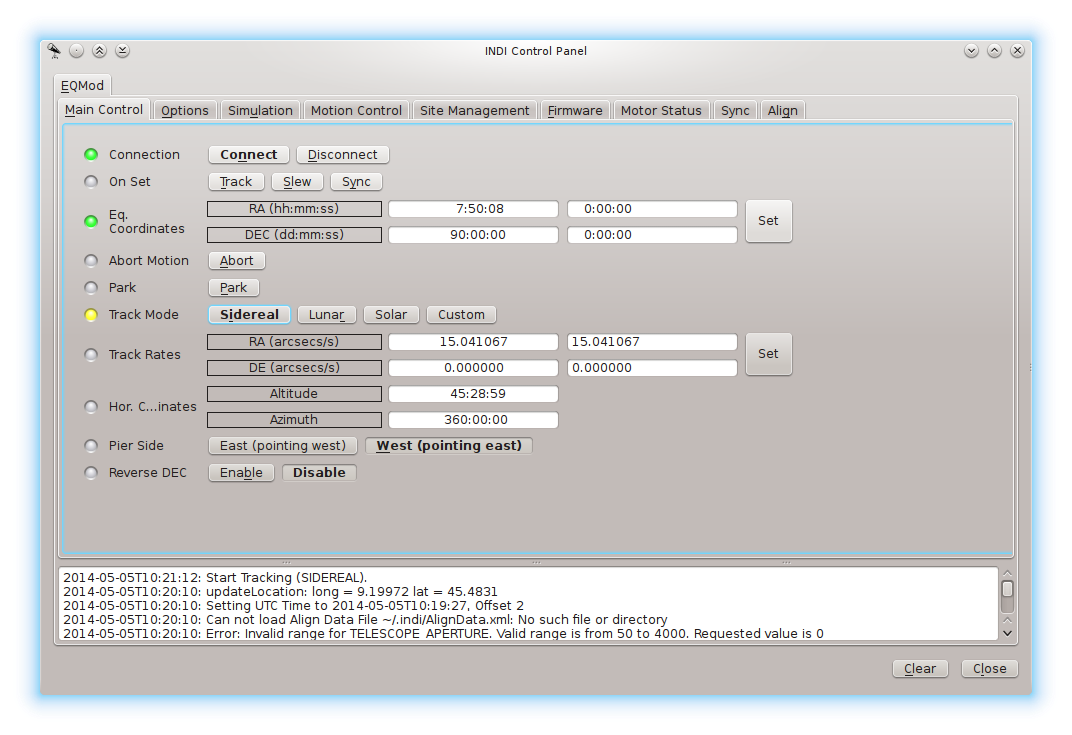
Pagina principale del dispositivo. Da qui possiamo vedere lo stato, le coordinate puntate, e le opzioni per il tracking. Come primissima cosa, per abilitare le operazioni, abilitare il tracking “Sideral”.
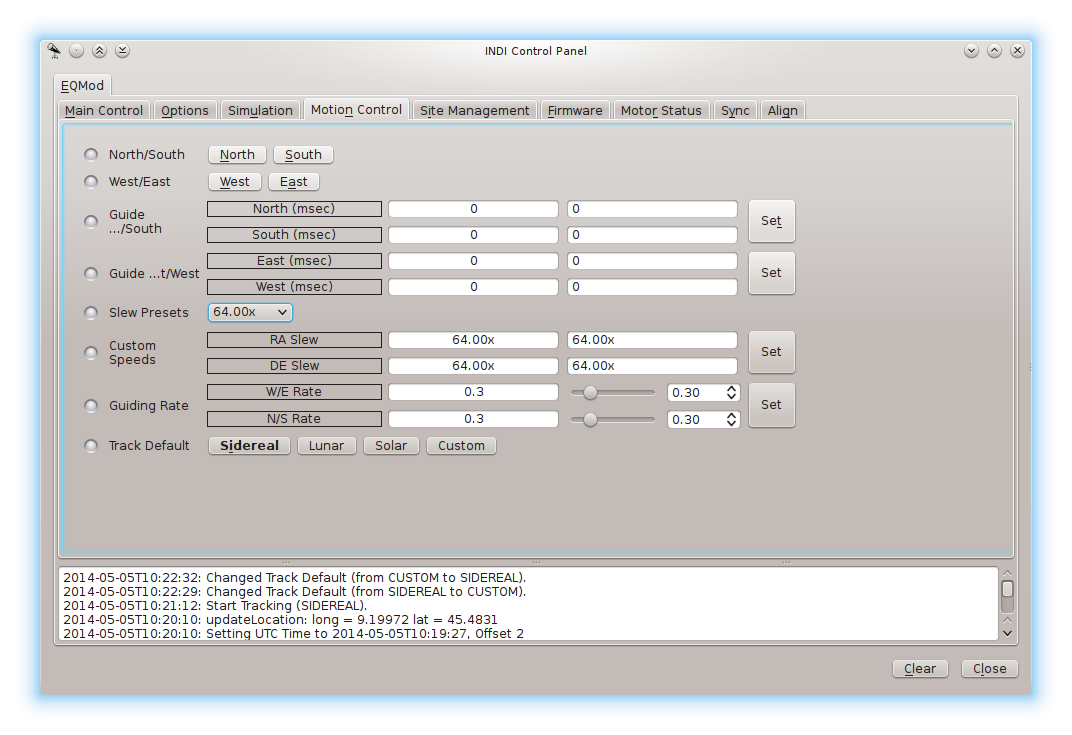
Nel tab “Motion Control” possiamo controllare manualmente la montatura per puntare e correggere. La combo “slew presets” ci permette anche di scegliere la velocità con cui effettuare i movimenti
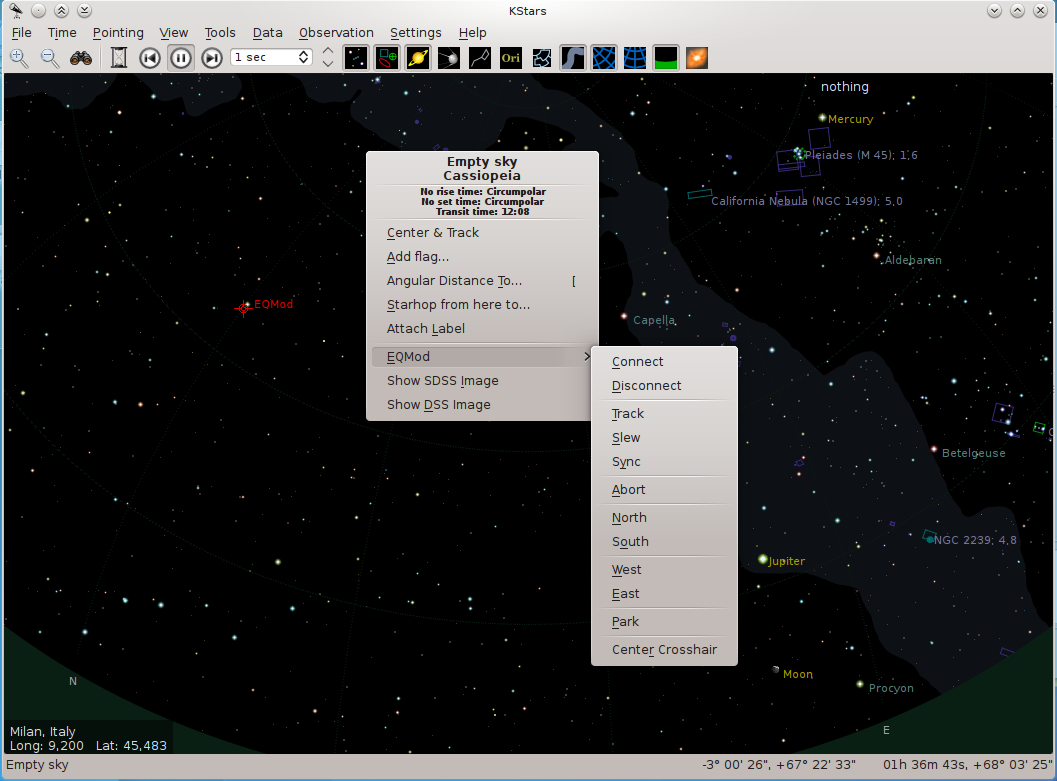
Tornando a KStars e cliccando col tasto destro sul cielo (o ancor meglio su un oggetto) vediamo comparire la nuova voce di menù “EQMod” che ci permetterà di controllare la montatura.
Dall’ultimo screenshot sono particolarmente utili le seguenti azioni:
- Center Crosshair: sposta l’inquadratura di KStars centrando la zona di cielo puntata dalla montatura.
- Sync: particolarmente importante, permette di allineare la montatura. Non avendo encoders assoluti infatti, bisogna comunicare al software quale zona di cielo stiamo puntando per allineare la montatura. Possiamo quindi inquadrare manualmente una stella conosciuta col telescopio, selezionarla su KStars col tasto destro, e quindi cliccare Sync per effettuare l’allineamento.
- Track e Slew, permettono invece di muovere la montatura verso l’oggetto selezionato.
Questo è quanto per un funzionamento “base” di KStars e INDI. In realtà il software è particolarmente ricco di opzioni e funzionalità, e merita sicuramente menzione Ekos, un tool interno a KStars particolarmente avanzato e molto indicato per astrofotografia, che offre molte opzioni utili per la ripresa delle immagini, la messa a fuoco (sia automatica che manuale), correzione automatica degli errori di puntamento della montatura, e tanto altro. Spero di testarlo a dovere, per approfondire l’argomento in un prossimo post.
In the last few months I started again deditcating more time on astronomy and star gazing.
To better organize my star gazing sessions I started developing a software capable of suggesting celestial object from various catalogues, choosing them among the best visible ones for the selected date and place, and that’s how SkyPlanner got started.
SkyPlanner has many features useful for visual observations: it allows searching and even suggests many objects from many catalogues, such as Messier, NGC/IC, Abell, Arp, MCG, UGC; provides information about the star gazing session, for instance weather, sun and moon rise/set time, moon phase; allows you to set your own telescopes, automatically estimating each object difficulty for the selected instrument; downloads preview images of the object field from the Digitized Sky Survey Archive, presents additional catalogue information and allows you to set your own notes before and after the visual observation.
The objects list is automatically sorted by transit time, creating a printer-friendly star gazing schedule.
I hope this software will help many of you organizing your best star gazing sessions!
I’m open for suggestions, feedback and error reporting, both in my blog here, or through SkyPlanner feedback form page. A more detailed features list and review is in this page.
Happy star gazing!