A very convenient tecnique in c++ programming is the one known with many names: "d-pointer" (found in Qt/KDE contexts), shadow pointer, "pimpl", opaque pointer. Basically the idea is to hide all the private details of a class in a forward declared private pointer, which will be the only real private member of the class. Since this member will never change, this will guarantee binary compatibility among different versions of a library.
But there are other advantages in using d-pointers: one is compilation speedup during development (usually if you change a private member of a class, the header changes, and you have to recomplile all units using that header, while with d-pointer you change only the .cpp file), and another is code cleanup: you will have very compact header files, describing your class public interface without private stuff pollution. Also, sometimes you may want to add your d-pointer definition in a separate header file, ending up with three well defined files:
- myclass.h: class declaration, only public stuff, without private stuff
- myclass_p.hpp: private class declaration: only private stuff, no implementations
- myclass.cpp: only implementations
The classical approach is to create a plain raw pointer to a forward declared class, initialize it in the constructor, and delete it on the destructor. A nice addition is to have the private class be a nested type, so that you can avoid polluting your IDE class list.
It’s been a long time since I last wrote about SkyPlanner development, but I still kept working on it, enabling lots of new features.
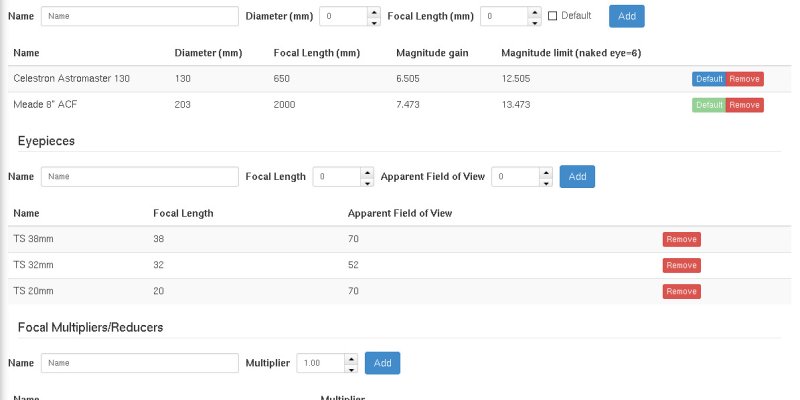
The Telescopes page has been redesigned to include also eyepieces and barlow/focal reduces, and therefore has also been renamed to “Optical Instruments” in your settings menu.

Adding at least a telescope and an eyepiece will show a new panel in the session pages, with all possible combinations, calculating magnification and field of view.
It will also add a new menu when clicking on a DSS preview image, that will show you field of view circles overlay.


Filters have been heavly improved. We have now lots of new filters, and the existing ones were redesigned to offer a better experience.
Now you can filter by object type, by magnitude, time of transit, altitude, constellation, previously observed objects, angular size, catalogue. Filters are available both in the main objects list and in the “Suggested Objects” panel, allowing you to fine tune SkyPlanner suggestions for planning your stargazing night.
The “Suggested Objects” list can now be sorted also by magnitude and time.
A new interesting feature is the post-session report: when reviewing a past session, you can mark as observer each object in your list.
After doing so, a “report” button will appear for that object, allowing you to write an extended description of your observation.
Finally, clicking the “Report” button on the top toolbar will display your report almost ready to be printed. You may wish to click the “Write report” button to write some notes about the whole session, instead of single objects.
Additionally, you can share your report. By default this is disabled, but clicking the “Share” button will make it publicly available.
You can share it with a few options: first, a web address, that you can embedd on your blog/website, or send via email. But you can also one of the predefined buttons for social sharing, on Google+, Facebook, Twitter.
But sharing is now enabled also for the regular session planning: in the “preview with images” section of a planned session you’ll see the same “Share” button.
Lastly, there were a few additions to the objects catalogues, most notably the Barnard catalogue of dark objects.
These were just a few highlights, to find out more just go to SkyPlanner home page and try it.
I’ve been long waiting for sharing SkyPlanner source code in a public repository.
Problem is, I had to fix a few copyright headers, cleanup some stuff, and, you know, laziness.
Now I finally published them on my GitHub account: https://github.com/GuLinux/SkyPlanner.
It’s still missing a README file for compiling and all, but if someone is curious about how SkyPlanner works, this is a huge start for poking it.
Happy hacking!
When programming in C++ it can often happen to be using C-style API.
These usually come in the form:
int some_api_call(char *inputParameter, char **outputParameter);where the return value is never a real output value, but instead an exit code, and usually 0 means success.
To handle such API in a sequence of operations, one is then usually blinded to do something like this:
 int result = first_c_api_call();
 if(result != 0) {
 cerr << "Error executing first_c_api_call: " << result << endl;
 return;
 }

result = second_c_api_call();
if(result != 0) {
cerr << "Error executing second_c_api_call: " << result << endl;
return;
}

result = third_c_api_call();
.....
and so on, which is kinda boring when you have to call lots of API functions in one method.
I have been trying to write some kind of wrapper that can help making this a bit easier.
In a real life example, I’ve been trying to use gphoto2 api in a c++11 application.
Using c++11 lambdas and RAII this is what I’ve been able to do:
 void GPhotoCamera::connect() {
      CameraAbilities abilities;
      GPPortInfo portInfo;
      CameraAbilitiesList *abilities_list = nullptr;
      GPPortInfoList *portInfoList = nullptr;
      CameraText camera_summary;
      CameraText camera_about;
      int model, port;
      gp_api{ {
        sequence_run( [&]{ return gp_abilities_list_new (&abilities_list); } ),
        sequence_run( [&]{ return gp_abilities_list_load(abilities_list, d->context); } ),
        sequence_run( [&]{ model = gp_abilities_list_lookup_model(abilities_list, d->model.toLocal8Bit()); return model; } ),
        sequence_run( [&]{ return gp_abilities_list_get_abilities(abilities_list, model, &abilities); } ),
        sequence_run( [&]{ return gp_camera_set_abilities(d->camera, abilities); } ),
        sequence_run( [&]{ return gp_port_info_list_new(&portInfoList); } ),
        sequence_run( [&]{ return gp_port_info_list_load(portInfoList); } ),
        sequence_run( [&]{ return gp_port_info_list_count(portInfoList); } ),
        sequence_run( [&]{ port = gp_port_info_list_lookup_path(portInfoList, d->port.c_str()); return port; } ),
        sequence_run( [&]{ return gp_port_info_list_get_info(portInfoList, port, &portInfo); return port; } ),
        sequence_run( [&]{ return gp_camera_set_port_info(d->camera, portInfo); } ),
        sequence_run( [&]{ return gp_camera_get_summary(d->camera, &camera_summary, d->context); } ),
        sequence_run( [&]{ return gp_camera_get_about(d->camera, &camera_about, d->context); } ),
      }, make_shared<QMutexLocker>(&d->mutex)}
      .on_error([=](int errorCode, const std::string &label) {
        qDebug() << "on " << label << ": " << gphoto_error(errorCode);
        emit error(this, gphoto_error(errorCode));
      }).run_last([&]{
        d->summary = QString(camera_summary.text);
        d->about = QString(camera_about.text);
        emit connected();
      });
      // TODO d->reloadSettings();
      gp_port_info_list_free(portInfoList);
      gp_abilities_list_free(abilities_list);
}
I can then declare some variables in the first part of the method, and inside the “gp_api” block i can execute a sequence of operation, each one returning an int value. This value is automatically checked for an error, and if it it’s a success exit code, the next sequence block is executed.
run_last is finally executed if all steps are completed successfully. An optional mutex locker (QMutexLocker) is passed to the gp_api block as the last constructor argument, to automatically lock the c api for multithreading.
How have I accomplished this?
This is the main class so far:
#include <functional>
#include <list>
#include <mutex>

typedef std::shared_ptr<std::unique_lock<std::mutex>> default_lock;
template<typename T, T defaultValue, typename check_operator = std::equal_to<T>, typename RAII_Object = default_lock>
class sequence {
public:
  typedef std::function<T()> run_function;
  typedef std::function<void(const T &, const std::string &)> on_error_f;
  struct run {
    run_function f;
    std::string label;
    T check;
    run(run_function f, const std::string &label = {}, T check = defaultValue) : f(f), label(label), check(check) {}
  };
  sequence(const std::list<run> &runs, const RAII_Object &raii_object = {}) : runs(runs), _check_operator(check_operator{}), raii_object(raii_object) {}
  ~sequence() {
    for(auto r: runs) {
      T result = r.f();
      if(! _check_operator(result, r.check)) {
    _run_on_error(result, r.label);
    return;
      }
    };
    _run_last();
  }
  sequence &on_error(on_error_f run_on_error) { _run_on_error = run_on_error; return *this; }
  sequence &run_last(std::function<void()> run_last) { _run_last = run_last; return *this; }
  sequence &add(run r) { runs.push_back(r); }
private:
  std::list<run> runs;
  on_error_f _run_on_error = [](const T&, const std::string&) {};
  check_operator _check_operator;
  std::function<void()> _run_last = []{};
  RAII_Object raii_object;
};
#define sequence_run(...) { __VA_ARGS__ , #__VA_ARGS__}
The sequence class accepts a list of runs as construction parameters. These are stored as a class field, and sequentially executed at class destruction.
Sequence is a template class: you can define the return value type, the success value, a comparison operator to check each function result code against the success value, and finally a generic RAII_Object, which can be as previously told a mutex locker, or some other kind of resource to unlock after API executions.
The define directive at the end of the code is used to automatically create a run object which already contains a description of the code being executed (stringified).
You get this description in the on_error callback.
Near my gphoto class I also added a typedef to conveniently call the proper sequence template class with correct template parameters:
typedef sequence<int, GP_OK, std::greater_equal<int>, std::shared_ptr<QMutexLocker>> gp_api;Which means that gp_api accepts code blocks returning int values, that the “ok” value is GP_OK (0), and that the returned value must be equal or greater than GP_OK to be considered a success run.
It also accepts a QMutexLocker shared pointer for thread locking.
As you can see in my first example I didn’t assign the gp_api object to any variable; this means that it is immediatly created, executed and destructed, for synchronous run.
So this is a simplified usage example:
gp_api{ {
  sequence_run([&]{ return first_c_api_call(); }),
  sequence_run([&]{ return second_c_api_call(); }),
}, std::make_shared<QMutexLocker>(&&;mutex)}
  .on_error([=](int errorCode, const std::string &label) {
      std::cerr << "Error at code block " << label << ": " << errorCode << std::endl;
    })
  .run_last([&]{
    // run when everything runned smoothly
});Notice: this article is currently available in italian only.
I will translate it soon. You may contact me via comments if you want me to “prioritize” this article first.
template<typename T>
class Fill {
private:
  T *array;
  long _size;
  T _value;
public:
  Fill(T *a) : array(a) {}
  Fill &size(long s) { _size = s; return *this; }
  Fill &with(T value) { _value = value; return *this; }
  ~Fill() {
    for(long i=0; i<_size; i++) array[i] = _value;
  }
};
Utilizzo snippet:
int array[10];
Fill<int>(array).size(10).with(1);
Ecco un po’ di teoria di cosa succede.
RAII è una tecnica che permette di sfruttare una caratteristica del c++ che lo differenzia dai linguaggi con garbage collector (Java, ad esempio): la certezza di quando il distruttore della classe verrà chiamato.
L’idea è di sfruttare entrata ed uscita dallo scope di una variabile per effettuare acquisizione e deallocazione delle risorse. O per dirla in altri termini, per eseguire istruzioni all’ingresso e all’uscita di uno scope.
In questo caso stiamo creando una istanza anonima della classe Filler.
Alla sua inizializzazione passiamo al costruttore
Fill<int>(T *a) : array(a) {}un array, che vogliamo riempire. Il costruttore lo memorizzerà nel suo field “array”.
Con il metodo “size” diciamo quanti elementi dell’array vogliamo riempire, mentre col metodo “with” impostiamo il valore con cui riempire l’array.
Entrambi questi metodi tornano un riferimento a “this”, ossia all’istanza corrente, in modo da “tenerla viva” nello scope, e permettendo di effettuare method chaining.
Infine, quando la variabile scompare dallo scope (ossia subito, visto che è anonima), viene chiamato il distruttore, che contiene il ciclo for che riempie l’array col valore che abbiamo impostato.
E’ interessante notare come, non essendoci nessun metodo che esplicitamente riempie l’array, l’ordine delle chiamate è perfettamente invertibile: avrei infatti potuto ugualmente scrivere
Fill<int>(array).with(1).size(10);E funzionerebbe nello stesso identico modo, dato che il riempimento vero e proprio verrà comunque effettuato nel distruttore.
Si tratta ovviamente di un esempio relativamente banale, ma che fa intuire la potenza della tecnica.
Basti pensare ad altre applicazioni, come l’apertura di un file con chiusura automatica quando la variabile RAII esce dallo scope, o una transazione che inizia nel costruttore, e viene automaticamente committata nel distruttore, o addirittura, nel c++11, l’esecuzione di una lambda quando la variabile RAII esce dallo scope.
class Scope {
  public:
    Scope(std::function<void()> onExit) : _onExit(onExit) {}
    ~Scope() { _onExit(); }
  private:
    std::function<void()> _onExit;
};
RAII viene molto usato sopratutto per gestire al meglio le eccezioni: non è infatti necessario un blocco finally come in Java, dato che sia in caso di eccezione che nel flusso normale la variabile viene comunque deallocata, e il distruttore invocato.
As i wrote some days ago, I planned on doing some hack so control KStars with a Wiimote.
It turned out KStars isn’t the right target, as it seems to have no plug-in support (and I don’t want to modify core yet, as i’m still in an experimental phase).
But reading data from wiimote and correctly interpreting was already done some days ago, thought it was a little bit hard, so I switched to Stellarium instead.
This is the result:
Of course it’s just experimental code, it’s barely usable.. but it’s a start.
Source is here: https://github.com/rockman81/StellariumWiimotePlugin
Now some technical stuff:
The Wiimote gyro sensors aren’t easy to read, as they don’t send you current angle, but only
It doesn’t report current angle, instead it does report angular speed.
But afterall you can deduce current angle just dividing speed by elapsed time between each message report.
I had to do some tries before finding the proper way of “moving view window” on Stellarium.
It’s not so well documented, and i’m not exactly happy about current solution, but it works, and i’ll ask some help in their mailing list soon.
This solution anyway is easier than i thought, as it only receives as input angles delta, meaning it’s also easy to “align” your telescope to stellarium (just point an object with telescope, then manually point stellarium to that object).
What’s missing:
- better calibration (angles “seem” correct, but i’m not entirely sure…)
- better movement translation (i’m ignoring one axis, they should be all taken into account, and compensate misalignment).
- Maybe some alternative way of displaying wiimote data in stellarium, such as a “virtual” object in sky. this way you can see how close is your telescope to a desired object.
- Equatorial mount support (currently if there is an axis rotation it’s not detected and properly corrected, and it’s interpreted the wrong way).
- ….many other stuff, but it’s too early to get a detailed list 😛