Last august I had the chance to see the International Space Station passing in front of the moon right from my home.
The ISS is clearly visible many nights, and depending on the user position on Earth, it might align with some object in the sky.
These days I was reorganizing my gallery, and I found the original video.
So, after reprocessing it a while, I decided to republish it.
The ISS is really fast: the video is slightly slowed down. I remember that during the transit I couldn’t see the station, and I waited a few minutes because I couldn’t know if the transit already happened or not: it was still daylight, and in the original frames is barely visible.
Only after watching the video I could finally notice that tiny dot passing right in front of the moon.
ISS transits over the Moon
Video on youtube: https://youtu.be/Fcwv85l20Xo
I shot this with my 130mm F/5 telescope, to be sure to have a field wide enough to not miss the space station.
It was still daylight, with the moon very low in altitude.
Also, I had to track the moon manually, since this telescope has a dobsonian mount.
For this shot, I used my old Celestron Astromaster 130, in an alt-azimuth mount, and my QHY5L-IIm as shooting camera. I had to try following manually the moon, since I obviously had no motorized tracking.
I had to use the 130mm scope instead of my main 8″ scope because of the shorter focal length: this way I could shoot almost the whole moon, so I could be sure that I didn’t miss the ISS.

Spring is back, and here in Milan we finally had a few days (and nights) of very nice weather.
I also bought a new lightweight battery for my HEQ5 mount, instead of the usual heavy car battery I’ve been using until now, so I took a minimal setup and placed myself in a local park.
Seeing wasn’t perfect, but it was fine enough to shoot a few nice details of an almost full moon.
Gassendi, Mare Humorum
Crater Gassendi
More importantly, Jupiter was at opposition a few weeks ago, so it’s still in a very favourable position.
Jupiter with satellites

Jupiter
All these shots were done using my own Planetary Imager.
Image processing was done using Autostakkert (stacking), Registax (wavelets), and GIMP (post processing).
After rediscovering Siril, a nice astronomical images preprocessing tool for GNU/Linux, I wanted to give another try at processing a few test images taken this summer.
It’s surely not a masterpieces, but I’m not too disappointed either by what I could make of them, given that it was just a basic attempt, with no more than half hour total shoot time.
M42
Postrocessing was done using DarkTable.
Another couple of high resolution images, taken on the Appennines, with quite a lucky seeing.
Jupiter is now rising earlier, and it was a welcome preview to the observing night.
Firstly I tried shooting on prime focus, using small magnification, and then I used a 2.5 barlow lens. The prime focus shooting should have been just a test, but it proved to be the better one, as I had troubles focusing with the barlow lens (we were already in “night” mode, and I had to darken a lot my monitor, so focusing was really difficult).
This is the prime focus shooting elaboration.
Jupiter
Saturn is starting to rise earlier, and around 4am is starting to be fairly hight for a few shots.
Since we already finished observing I could remove my notebook darkening panel, and focus quite better with the 2.5x barlow.
Error during Astrobin API call with code 404It was also a very satisfying deep sky stargazing night (which was actually the main purpouse of our trip to the Appennines).
Spring constellations enable us to go really “deep”, with very far and suggestive galaxy clusters.
Another shooting, much improved in quality compared to the previous ones: Jupiter bands are very well defined, rich of details, much more compared to the images of fifteen days ago: probably both because of the better seeing, and of the removal of the IR-pass filter, replaced with a more classical IR-Block, gathering much more light.
Jupiter, with Io shadow
The “guest” of the title is the dark dot almost at the center of the planet: it’s not an image artifact, but it’s the shadow of the Io satellite projected on the planet. Basically, a solar eclipse on Jupiter.
The satellite itself is not visible on the picture, submerged in the planet disk. The other two satellites are, from closest to farthest, Europa e Ganimede.
Notice: this article is currently available in italian only.
I will translate it soon. You may contact me via comments if you want me to “prioritize” this article first.
Per una serie di vicissitudini (e per il maltempo che l’ha fatta da padrone) non ho potuto osservare molto Giove, in opposizione proprio nei prossimi giorni, e quindi nel periodo di migliore osservabilità.
Ieri sera comunque sono riuscito ad effettuare qualche osservazione e qualche ripresa, approfittando di un seeing stranamente non cattivo come solitamente da casa mia: purtroppo non ho balconi o terrazzi, e mi tocca riprendere ed osservare dalla finestra aperta, cosa che alza di parecchio la turbolenza per il continuo passaggio d’aria tra interno ed esterno.
Jupiter - 2015-01-30
Infrared filter to block most of the atmospheric turbulence.
In visuale era piuttosto evidente la Grande Macchia Rossa, che nelle riprese invece sembra quasi invisibile. Non è infatti il globulo scuro che si vede nella banda in alto a sinistra. Questo perchè la ripresa è stata effettuata nel vicino infrarosso e non nel visuale, per ridurre l’interferenza atmosferica, quindi i dettagli visibili nella ripresa sono un po’ diversi da quelli che si vedono ad occhio nudo.
Si vedono molto bene anche due dei satelliti galileiani, Io ed Europa.
Ripresa effettuata al fuoco diretto di un Meade ACF 8″, 2000mm di focale, con filtro IR “Planet IR Pro 807“, camera QHY5II-L. Sommati circa 800 frames (di 2000 totali).
Aggiornamento, 02/02/2015
Giusto una manciata di giorni dopo ho potuto ripetere il tentativo, con una messa a fuoco un po’ più fortunata.
Non è visibile la macchia rossa, in questo caso, ma sono riuscito a tenere nel campo tutti e quattro i satelliti galileiani.
Jupiter and galileian satellites - 2015-02-02
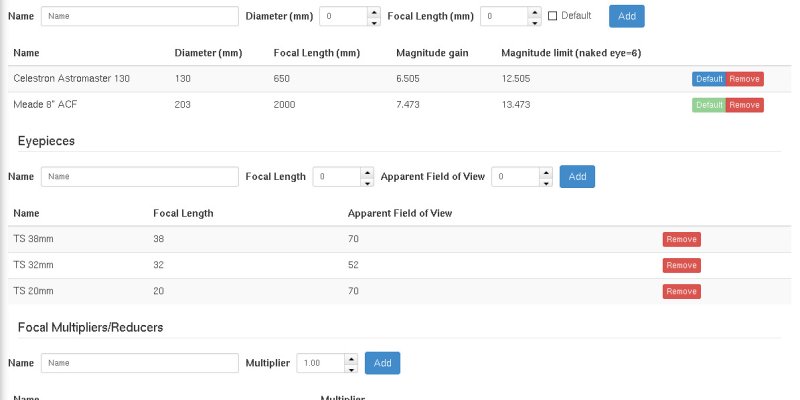
It’s been a long time since I last wrote about SkyPlanner development, but I still kept working on it, enabling lots of new features.
The Telescopes page has been redesigned to include also eyepieces and barlow/focal reduces, and therefore has also been renamed to “Optical Instruments” in your settings menu.

Adding at least a telescope and an eyepiece will show a new panel in the session pages, with all possible combinations, calculating magnification and field of view.
It will also add a new menu when clicking on a DSS preview image, that will show you field of view circles overlay.


Filters have been heavly improved. We have now lots of new filters, and the existing ones were redesigned to offer a better experience.
Now you can filter by object type, by magnitude, time of transit, altitude, constellation, previously observed objects, angular size, catalogue. Filters are available both in the main objects list and in the “Suggested Objects” panel, allowing you to fine tune SkyPlanner suggestions for planning your stargazing night.
The “Suggested Objects” list can now be sorted also by magnitude and time.
A new interesting feature is the post-session report: when reviewing a past session, you can mark as observer each object in your list.
After doing so, a “report” button will appear for that object, allowing you to write an extended description of your observation.
Finally, clicking the “Report” button on the top toolbar will display your report almost ready to be printed. You may wish to click the “Write report” button to write some notes about the whole session, instead of single objects.
Additionally, you can share your report. By default this is disabled, but clicking the “Share” button will make it publicly available.
You can share it with a few options: first, a web address, that you can embedd on your blog/website, or send via email. But you can also one of the predefined buttons for social sharing, on Google+, Facebook, Twitter.
But sharing is now enabled also for the regular session planning: in the “preview with images” section of a planned session you’ll see the same “Share” button.
Lastly, there were a few additions to the objects catalogues, most notably the Barnard catalogue of dark objects.
These were just a few highlights, to find out more just go to SkyPlanner home page and try it.
I’ve been long waiting for sharing SkyPlanner source code in a public repository.
Problem is, I had to fix a few copyright headers, cleanup some stuff, and, you know, laziness.
Now I finally published them on my GitHub account: https://github.com/GuLinux/SkyPlanner.
It’s still missing a README file for compiling and all, but if someone is curious about how SkyPlanner works, this is a huge start for poking it.
Happy hacking!
A shot at the moon taken in a last quarter evening.
It’s a mosaic of 78 pictures, each of them stacked from 300 frames of 500. Images were taken at primary focus of my Meade ACF 8″ (2000 mm focal length), using a QHY5II-L mono.
Moon (mosaic), September 2014
For each image I stacked 300 frames (out of 500).
Very poor seeing (lots of turbulence, since I shot it through an open window).
Seeing was a bit too bad (I have to shoot from my window, since I don’t have a garden, which can make turbulence even worse).
Even if it’s not a perfect result I’m pretty satisfied: given the conditions lots of details are visible, and it also look quite good.
I hope to be able to shoot something even better soon!
Notice: this article is currently available in italian only.
I will translate it soon. You may contact me via comments if you want me to “prioritize” this article first.
Altre riprese delle macchie solari, in una giornata in cui la nostra stella era particolarmente ricca di dettagli.
In questo caso, essendoci parecchie macchie a fare da punti di riferimento, sono riuscito a fare un buon numero di riprese sovrapponibili per creare un mosaico (purtroppo non completo).
Sun Spots - 2014 07-06
Sono circa una decina di immagini da 400 frames ciascuna (su 1000 totali).
L’elaborazione è stata fatta sempre con registax, l’unione del mosaico con Hugin.